
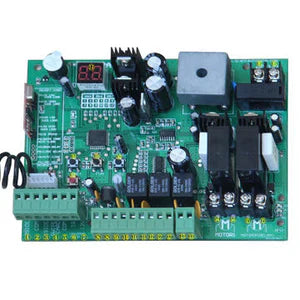
Hey everyone, Graham here from Gatehouse Security! 👋 Today, we’re going to take a look at this automatic gate control board—one you might already have in your gate kit.
This board has been around for about 20 years and is known for being reliable, robust, and easy to use. While they’re always upgrading these, the basics stay the same. So let’s dive in and check out how it works!"
[Step 1: Powering Up the Control Board]
- Plug in the power supply.
- The blue LED light turns on—this tells us the board is powered and ready.
[Step 2: Understanding the Connections]
-
Motor 1 & Motor 2 Connections:
- If you have a single gate, it always connects to Motor 2 (not Motor 1).
- If you have double gates, they connect to both Motor 1 and Motor 2.
- Remote Control Receiver: This is where your remotes communicate with the board.
- Antenna Connection: Helps improve remote signal strength.
[Step 3: Pairing a Remote Control]
- Find the "Learn" button on the board.
- Press and release it (you’ll see the blue light turn off).
- Press the button on your remote once.
- The board will detect and save the remote.
- Now, when you press the remote button, the blue light flashes—this means the gate is responding.
🛠 Tip:
- If you have a single gate, Button 1 controls it.
- If you have double gates, Button 2 will open both gates, while Button 1 will only open one (pedestrian mode).
[Step 4: Adjusting Auto-Close Settings]
- To activate Auto-Close, press and hold the Function button until “P” appears.
- Use the Incline button to scroll to P9 (Auto-Close setting).
- Press Function again—0 means OFF.
- Use the Incline button to select the number of seconds (e.g., 10 sec).
- Press Function to save.
Now, when the gate opens, the blue light will flash, counting down until it closes automatically.
[Step 5: Adjusting Speed & Stall Force]
- Bigger gates = Slower speed (to prevent excessive movement).
- If the gate stalls mid-motion, increase the stall force setting.
- Adjusting stall force:
- Go to Motor 1 or Motor 2 settings.
- Increase the stall force by 1-2 levels at a time.
- Test and repeat until the gate moves smoothly.
[Step 6: Power Options – AC or Solar]
- Running on 24V DC (Solar System) – Connect to the 24V input terminals.
- Running on AC Power – Connect a transformer to the AC terminals.
Common Question:
💡 "Why is my transformer labeled 18V when the board needs 24V?"
✅ That’s normal! The board converts 18V AC into 24V DC internally.
[Step 7: Troubleshooting Common Issues]
🚨 (Cover common problems and quick fixes)
1️⃣ Problem: Remote won’t pair or loses connection.
✅ Solution: The receiver module may need replacing (common after lightning storms).
2️⃣ Problem: Gate stops after moving a meter.
✅ Solution: Increase the stall force setting.
3️⃣ Problem: Signal range is weak.
✅ Solution: Extend the antenna wire or install an external antenna.
That’s a quick rundown of your gate control board and how to set it up for smooth operation! 🚀
If you have any questions, drop a comment below, and I’ll be happy to help. Also, don’t forget to like, subscribe, and hit the bell 🔔 so you don’t miss our latest videos on gate automation and security tips!
Thanks for watching—see you next time!"
Leave a comment
All comments are moderated before being published.
This site is protected by hCaptcha and the hCaptcha Privacy Policy and Terms of Service apply.